
You wonder how to make APK on android phone. Where to find build APK in android studio? Don’t worry! Click here to find out the way on how to create APK file immediately.
Publishable APK files are not the same as the rest of APK files. If you want to publish the app in the Google Play Store, you have to ensure that your Android app has a publishable APK file. Creating a publishable APK file is a complicated process. But if you follow our guides step-by-step, you can do it.
How to Create APK File
Wonder how to make APK in android phone, let’s see our guides.
Check Out: Install APK File
Step 1
Before starting creating an APK file, you should make sure that you have your code for the Google Play Store.
Step 2
Where to find build APK in android studio? Next, you choose “Build” and “Generate Signed APK” in Android Studio’s main menu. Next, on the screen, you will see the “Generate Signed APK” dialog box. The box has a list in which you can opt for one of your project’s modules.

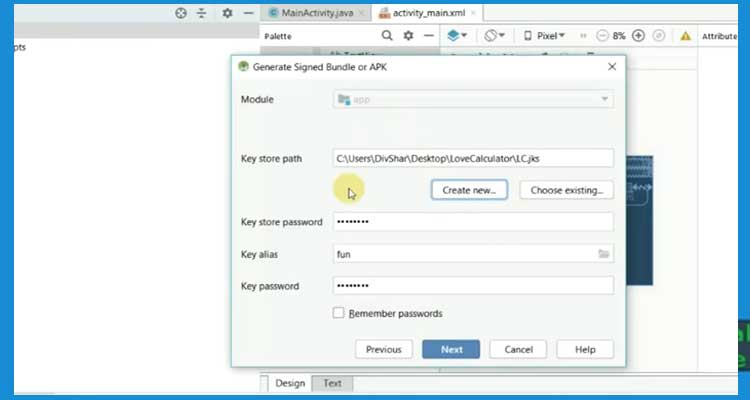
Step 3
You click “Next”, and you see another dialog box. On the screen, you can see a Key Store Path field.
Step 4
Once you have finished, you see the “Create New” button on the screen. Click the button, and a “New Key Store” dialog box opens.
Step 5
You name after and locate your key store. Then, in the dialog box’s Key Store Path field, you put the full pathname consisting of the filename and location.
Remember that you can use this store to sign other projects’ APK files if you publish more apps.
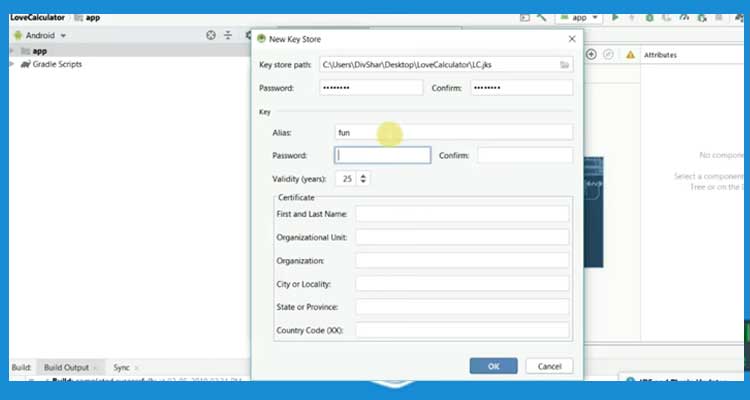
Step 6
Next, you type passwords in the “Password” button and then “Confirm” fields. It is better if you make strong passwords. You have to remember the password as you need it to sign other apps.
In the key store file, each key has a separated name like an alias.
Step 7
Write the alias that can be any string of characters as long as you remember it. Don’t add any blank spaces and punctuation. If you create a second key with the second alias, you don’t repeat the first one.
The key is valid for 25 years. For example, you create a new key on 10th November 2019, it will expire on 10th November 2044.
Step 8
 In the “Certification” field, you fill in at least one of six items. They consist of First and Last Name, Organizational Unit, city, country, and so on. The dialog of two people have the same name and living in the same city in the same country is close to zero.
Step 9
Once you have completed filling, you will see the dialog box resembles the image above. Click the “OK” button.
Step 10
Have done, the last “Generate Signed APK” dialog box appears. Click “Next”. Then in this box, you should take note of the APK Destination Folder. Besides, you choose “Release” from the “Build Type” list.
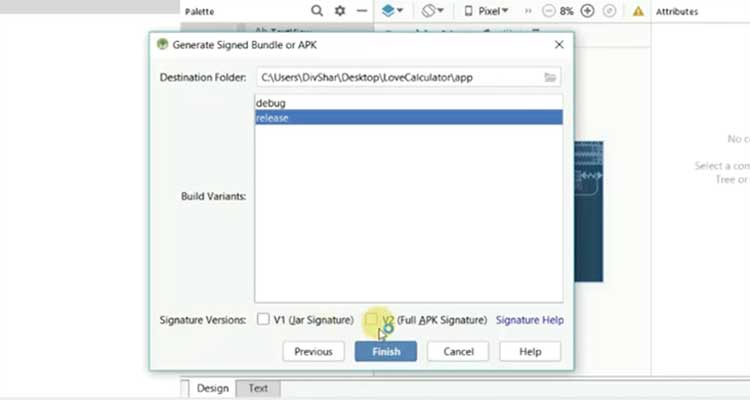
Step 11
It is the last step on how to make APK in an android phone. You click the “Finish” button. Now, Android Studio will occur and offer the folder including your new APK file.
Open APK File and look at your accomplishments. In case you don’t see the APK file in the folder, it may be due to your operating system. Don’t worry! It might be hiding the letters APK at the ends of filenames.
You have finished creating an APK file and a reusable key store for the next updates. Also, you can generate an unsigned APK android studio by creating it in Debug mode.
The Bottom Line
That’s all necessary steps on how to create APK file. Hopefully, you are successful in creating your own file by following our tutorial. If you have any trouble in the creating process or want to learn about APK File Structure or ABI Support in APK, don’t hesitate to raise your voice.


